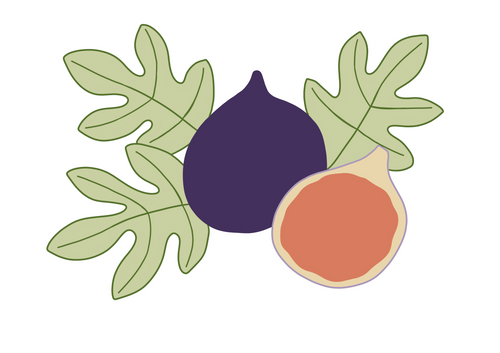
After sharing my experiments with embroidered figs, I'm inviting you to make this design for yourself. In this tutorial, we'll start with the leaves, embroider the whole fig with two shades of purple, then work the cut fig and the small details of the drawing.
I made this project with two different threads: J. Toulemonde's Saint-Pierre wool and Appleton wool. The pattern and stitches stay the same, but the choice of thread changes the finished look. The drawing was created specially for this project by my sister, the illustrator behind Sober Studio.
Materials for embroidering the figs
- Cotton fabric: mine came from LATATE.
- A hoop suited to the design, with enough space around it to embroider comfortably.
- Green, dark purple, medium purple, red and cream threads, in whichever range you choose from the two versions below.
- A size 9 needle for my Saint-Pierre version, or a size 7 or 6 for the Appleton version.
- Embroidery scissors and a transfer tool suited to your fabric.
- The pattern to download below.
Preparing the threads: my two versions
With J. Toulemonde's Saint-Pierre wool: I separated the strands of the thread, took a single strand, then doubled it for embroidering. So I work with two thicknesses of this separated strand, and a size 9 needle.
With Appleton wool, 2 strands: I used a size 7 or 6 needle.
In my tests, the Appleton version gives a thicker result, while the Saint-Pierre prepared this way allows for finer work. To see my impressions and the stitches I tested before settling on this combination, you can read my first article on wool figs.
Download the fig pattern
My embroidery measures about 10 cm wide. Here is the drawing to save so you can transfer it onto your fabric.

Download the fig pattern (JPG)
If the image opens in a new tab, save it with a right-click on a computer or a long press on a phone. Before printing, adjust the scale so the drawing measures about 10 cm wide and check with a ruler: the JPG file alone doesn't guarantee printing at this size.
Transfer the outlines, the leaf veins, the word and the small ornaments. There's no need to draw every fill stitch. If needed, see my methods for transferring a pattern onto fabric. Then mount the cotton in the hoop, taut but not distorted.
1. Embroider the leaves: chain stitch and seed stitch
I started with the leaves, using the green thread. First embroider their outlines in chain stitch, then their veins with the same stitch. Shorten the loop length on curves and hollows to follow the drawing.
To form a chain stitch, bring the thread up, insert it back close to where it emerged, then bring it up again a little further along while keeping the thread under the needle. Pull gently to form the loop, then repeat. Anchor the last loop with a small stitch at its tip.
Then fill the inside with seed stitch: scatter small straight stitches in different directions, between the outlines and veins. Leave visible patches of fabric to keep a light fill. Add the stitches gradually rather than filling too densely from the start.
2. Embroider the whole fig in Burden stitch
For the fig in the middle of the design, I chose dark purple for the laid threads and medium purple for the couching stitches on top.
- Lay the parallel threads in dark purple from one edge of the fruit to the other. Adjust their length to the outline and keep even spacing.
- With the medium purple, make the perpendicular stitches that catch the laid threads and build the fill.
- Offset the stitches between rows to create the Burden stitch structure, then continue to the edges of the fruit.
Keep an even tension: the threads should stay in place without digging into the cotton. For guidance on this stitch, see my article on Burden stitch. The Royal School of Needlework's Stitch Bank also offers step-by-step diagrams.
3. Outline the cut fig in stem stitch
Work from the outside in. I started with one purple line in stem stitch, then added three cream lines, side by side, with the same stitch.
In stem stitch, the stitches overlap slightly: bring the needle up at the midpoint of the previous stitch and always keep the thread on the same side of the needle. Make shorter stitches on curves for an even outline.
The three cream lines follow the first purple line, moving gradually closer to the centre. Leave the central area free for the red French knots.
4. Fill the centre with red French knots
Embroider the centre of the cut fig in French knots, with the red thread. These small raised dots represent the inside of the fruit.
Bring the thread up on the right side, wrap it around the needle, then insert it back close to the point where it emerged, holding the thread taut. Slide the needle through gently to form the knot. Avoid re-inserting into exactly the same hole, where the knot could disappear.
Spread the knots across the central area, then fill in the gaps to the density you want, without covering the cream border.
5. Embroider the word and the small ornaments
To finish the drawing, I used stem stitch for the word "fig", seed stitch for the small decorative dots and straight stitch for the stars.
Follow the curves of the lettering with small stem stitches. For the stars, adjust the length of the straight stitches to the lines of the drawing. You can choose their colours from your palette to match the leaves or the fruit.
Finishing the embroidery
Check that your threads are properly secured on the back, then remove any markings following your transfer tool's instructions. If this step involves wetting the fabric, test it first on a scrap with the same threads.
You can keep your embroidery in its hoop or work it into a project. For a finish in the hoop, see the guide to mounting and framing an embroidery.
If you make this design, feel free to show me your version on Instagram by tagging @faienca_broderie. I'd love to see your figs and your choice of threads!